Wednesday, July 22, 2015

Jquery Confirm Yes No example in JSfiddle

Following example shows the confirmation dialog box with a yes/no buttons using Jquery.

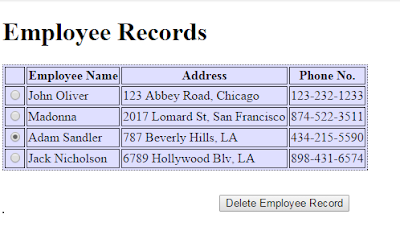
We have a employee table with radio buttons. A user can select a radio button and click on the delete button to delete the employee record.

I have created a simple Confirm dialog with not much styling, but we can always customize the html to make it look better.

Example :


A working example can be seen in JSFiddle at : http://jsfiddle.net/sanjayingole/9Lyfy9ay/1/

Javascript : 

// openDeleteConfirmDialog opens the confirmation dialog box
function openDeleteConfirmDialog() {
   
$("#selectedEmployee").html($("td[id='"+ $("input[name='empid']:checked").val() +"']").html());
   
    // Define the Dialog and its properties.
    $("#confirmDeleteDialog").dialog({
        resizable: false,
        modal: true,
        title: "Modal",
        height: 150,
        width: 500,
        buttons: {
            "Yes": function () {
                $(this).dialog('close');
                performAction(true);
            },
                "No": function () {
                $(this).dialog('close');
                performAction(false);
            }
        }
    });
}

// Call the openDeleteConfirmDialog method on Buttons click
$('#btnDeleteEmployee').click(openDeleteConfirmDialog);

// delete record if user clicked Yes on confirmation dialog
function performAction(action) {
    if (action) {
        $("input[name='empid']:checked").parent().parent().hide();
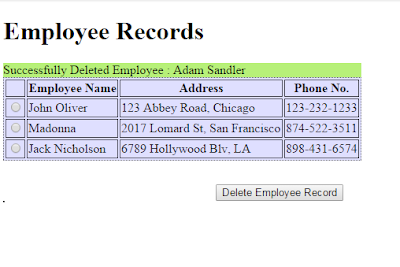
        $("#confirmMessage").html("Successfully Deleted Employee : " + $("td[id='"+ $("input[name='empid']:checked").val() +"']").html());
    } else {
    // Do nothing
    }
}

HTML Code:

<H1>Employee Records </H1>
<div id="confirmMessage">  
</div>
<table>
     <tr>
        <th></th>
        <th>Employee Name</th>
        <th>Address</th>
        <th>Phone No.</th>
    </tr>
     <tr>
        <td><input type="radio" name ="empid" id="empid" value="empid1"></input></td>
        <td id="empid1">John Oliver</td>
        <td>123 Abbey Road, Chicago</td>
        <td>123-232-1233</td>
    </tr>
     <tr>
        <td><input type="radio" name ="empid" id="empid"  value="empid2"></input></td>
        <td id="empid2">Madonna</td>
        <td>2017 Lomard St, San Francisco</td>
        <td>874-522-3511</td>
    </tr>
     <tr>
        <td><input type="radio" name ="empid" id="empid"  value="empid3"></input></td>
        <td id="empid3">Adam Sandler</td>
        <td>787 Beverly Hills, LA</td>
        <td>434-215-5590</td>
    </tr>
    <tr>
        <td><input type="radio" name ="empid" id="empid"  value="empid4"></input></td>
        <td id="empid4">Jack Nicholson</td>
        <td>6789 Hollywood Blv, LA</td>
        <td>898-431-6574</td>
    </tr>
<table>

<input type="button" id="btnOpenDialog" value="Delete Employee Record"/>

<div id="confirmDeleteDialog" class="confirmDeleteDialog"
style="border: 1px solid #000000; display: none;">
<div class="sectionHeader" style="top: 0px;">
<span class="sectionTitle">Delete Employee Record</span>
        <span id="selectedEmployee"></span>
</div>
</div>

CSS Code :

table {
    background : #DfDfFF;
    border : 1px dotted;
    margin-left 30px;
    margin-bottom : 30px;
}
th {
    border : 1px solid;
}
td {
    border : 1px solid;
}

#btnDeleteEmployee {
  margin-left : 270px;
}
#confirmMessage {
    background-color : rgb(183, 240, 121);
    width : 455px;
}
.confirmDeleteDialog {
width : 700px;
height : 100px;
padding : 20px;
background-color : #d6d8d9;
background: #d6d8d9;
}

.ui-dialog-titlebar {display:none;}

.ui-widget-overlay {
background: black;
opacity: .8;
filter: Alpha(Opacity=30);

}


Tuesday, July 21, 2015

Uncaught InvalidCharacterError: Failed to execute 'createElement' on 'Document': The tag name provided ('') is not a valid name.(anonymous function) @ (index):62

Getting following error while calling an old javascript method which dynamically creates a column in a table.

Uncaught InvalidCharacterError: Failed to execute 'createElement' on 'Document': The tag name provided ('<TD class="column" style="white-space:nowrap; text-align:right;">') is not a valid name.(anonymous function) @ (index):62

I reproduced the same on jsfiddle with following code (http://jsfiddle.net/sanjayingole/068ut9tp/1/)

<div id="employeeDiv" class="tableDiv empDiv">
    <table id="employeeTable">    
    </table>
</div>

<!-- Javascript to dynamically create TD tag-->
<script>
var newTable=document.getElementById("employeeTable");

newtablebody = document.createElement("TBODY");
newRow   = document.createElement("TR");

//The Javascript tries to create the TD element with some html code. 
//Which is causing this error.
newCell = document.createElement("<TD class=\"column\" style=\"white-space:nowrap; text-align:right;\">");


textNode = document.createTextNode(displayname);
newCell.appendChild(textNode);
newRow.appendChild(newCell);

</script>

Solution:

Initially I suspected the double quotes was causing the problem and changed it to single quotes instead, but that dint solve the problem either.
Following worked fine :
Instead of creating elements like :

              document.createElement("<TD class=\"column\" style=\"white-space:nowrap; text-align:right;\">");

use following :

newCell = document.createElement("TD");   
newCell.setAttribute("style", "white-space:nowrap; text-align:right;");

Following example shows the fix :
http://jsfiddle.net/sanjayingole/068ut9tp/3/


Personally Jquery would be a lot convenient to implement dynamic components. For example datatables are very easy to implement and rendering part is taken care of by jquery.

Monday, July 20, 2015

Google Chrome throwing : Uncaught TypeError: Cannot read property 'value' of undefined

Just found this Javascript error in google chrome which causes form submission failure. The same code works fine in Internet Explorer.

Uncaught TypeError: Cannot read property 'value' of undefined
Looks like the chrome is trying to access these element before the page is loaded as adding this js after body tag doesn't throw the same error.

Generate and Using SSH Key


An SSH key allows you to login to a server from another computer without a password. This is useful when we access the remote server frequently and want to be automatically authenticated through SSH.
Two basic steps:
1. Generate an SSH key on your computer.
2. Copy the generated SSH key on the target Server. 
The target server authenticates any incoming SSH request using the key provided in SSH request.
Following explains how to generate and use SSH Key :

To generate a ssh file run the following command :

ssh-keygen -t rsa -C <<key name>>

i.e.
bash-3.2$ ssh-keygen -t rsa -C "testsshprofile"

The above will als ask for a passphrase, which is optional, but provids additional security to your ssh file by encrypting it and putting it in a restricted directory. If you provide a passphrase you will have to enter it every time you use SSH to connect to target server.


// The above will generate private and public files i.e. testsshprofile and testsshprofile.pub

  • testsshprofile :  Its the private key file and should not be shared. Anyone with this file can access the sever.  Here is the sample contents of the testsshprofile:

  • testsshprofile.pub : this is the public key file that is shared with the remote server, so it can recognize your machine. The contents of this file needs to be copied on target server in ssh configuration. Here is the sample contents of the testsshprofile.ssh:


Copy the SSH key on Remote Server:

Once the ssh files are generated we need to copy over the ssh file on target server. I assume you have the access to the target server and have required permission to edit ssh configs.

You can use the following command to append the public key on server

cat ~/.ssh/testsshprofile.pub | ssh user@hostname 'cat >> .ssh/authorized_keys'

You can also edit this file manually if you have access to the target server and you are trying to provide access to this server to some other users.

1. On your target server go to the ssh directory, you should see authorized_keys file in ssh directory.
>>  cd ~/.ssh

authorization  authorized_keys  id_rsa  id_rsa.pub  known_hosts

>> Edit the authorized_keys file and append the contents of the your public key (i.e. "testsshprofile.pub") in this file.

2. Restart the ssh service :

>> sudo /etc/init.d/sshd restart

// For Ubuntu
>> sudo service ssh restart

// CentOS
>> sudo service sshd restart

Connecting to the Server :

Once we have generated the SSH key and copied the ssh file over to target server, we can use the following command to access the remote server.

>> ssh -i <<path to public key>> user@<<IP address>>

i.e.  ssh -i /test/location/testsshprofile.pub devuser@10.1.20.129

Make sure your ssh file has the correct permission or else you might get authentication error.

>> chmod 600 testsshprofile


Friday, July 17, 2015

Exception Ocured Spring MVC web application deployment : java.lang.NoClassDefFoundError: org/codehaus/jackson/map/ObjectMapper

Looking for solution to the following exception:

An error occurred during activation of changes, please see the log for details.
Message icon - Error [HTTP:101216]Servlet: "sysprop" failed to preload on startup in Web application: "sysprop". org.springframework.beans.factory.BeanCreationException: Error creating bean with name 'jsonHttpMessageConverter' defined in ServletContext resource [/WEB-INF/sysprop-servlet.xml]: Instantiation of bean failed; nested exception is org.springframework.beans.BeanInstantiationException: Could not instantiate bean class [org.springframework.http.converter.json.MappingJacksonHttpMessageConverter]: Constructor threw exception; nested exception is java.lang.NoClassDefFoundError: org/codehaus/jackson/map/ObjectMapper at org.springframework.beans.factory.support.AbstractAutowireCapableBeanFactory.instantiateBean(AbstractAutowireCapableBeanFactory.java:1076) at org.springframework.beans.factory.support.AbstractAutowireCapableBeanFactory.createBeanInstance(AbstractAutowireCapableBeanFactory.java:1021) at org.springframework.beans.factory.support.AbstractAutowireCapableBeanFactory.doCreateBean(AbstractAutowireCapableBeanFactory.java:504) at org.springframework.beans.factory.support.AbstractAutowireCapableBeanFactory.createBean(AbstractAutowireCapableBeanFactory.java:475) at org.springframework.beans.factory.support.AbstractBeanFactory$1.getObject(AbstractBeanFactory.java:304) at org.springframework.beans.factory.support.DefaultSingletonBeanRegistry.getSingleton(DefaultSingletonBeanRegistry.java:228) at org.springframework.beans.factory.support.AbstractBeanFactory.doGetBean(AbstractBeanFactory.java:300) at org.springframework.beans.factory.support.AbstractBeanFactory.getBean(AbstractBeanFactory.java:195) at org.springframework.beans.factory.support.DefaultListableBeanFactory.preInstantiateSingletons(DefaultListableBeanFactory.java:700) at org.springframework.context.support.AbstractApplicationContext.finishBeanFactoryInitialization(AbstractApplicationContext.java:760) at org.springframework.context.support.AbstractApplicationContext.refresh(AbstractApplicationContext.java:482) at org.springframework.web.servlet.FrameworkServlet.configureAndRefreshWebApplicationContext(FrameworkServlet.java:658) at org.springframework.web.servlet.FrameworkServlet.createWebApplicationContext(FrameworkServlet.java:624) at org.springframework.web.servlet.FrameworkServlet.createWebApplicationContext(FrameworkServlet.java:672) at org.springframework.web.servlet.FrameworkServlet.initWebApplicationContext(FrameworkServlet.java:543) at org.springframework.web.servlet.FrameworkServlet.initServletBean(FrameworkServlet.java:484) at org.springframework.web.servlet.HttpServletBean.init(HttpServletBean.java:136) at javax.servlet.GenericServlet.init(GenericServlet.java:241) at weblogic.servlet.internal.StubSecurityHelper$ServletInitAction.run(StubSecurityHelper.java:283) at weblogic.security.acl.internal.AuthenticatedSubject.doAs(AuthenticatedSubject.java:321) at weblogic.security.service.SecurityManager.runAs(SecurityManager.java:120) at weblogic.servlet.internal.StubSecurityHelper.createServlet(StubSecurityHelper.java:64) at weblogic.servlet.internal.StubLifecycleHelper.createOneInstance(StubLifecycleHelper.java:58) at weblogic.servlet.internal.StubLifecycleHelper.<init>(StubLifecycleHelper.java:48) at weblogic.servlet.internal.ServletStubImpl.prepareServlet(ServletStubImpl.java:539) at weblogic.servlet.internal.WebAppServletContext.preloadServlet(WebAppServletContext.java:1981) at weblogic.servlet.internal.WebAppServletContext.loadServletsOnStartup(WebAppServletContext.java:1955) at weblogic.servlet.internal.WebAppServletContext.preloadResources(WebAppServletContext.java:1874) at weblogic.servlet.internal.WebAppServletContext.start(WebAppServletContext.java:3154) at weblogic.servlet.internal.WebAppModule.startContexts(WebAppModule.java:1518) at weblogic.servlet.internal.WebAppModule.start(WebAppModule.java:484) at weblogic.application.internal.flow.ModuleStateDriver$3.next(ModuleStateDriver.java:425) at weblogic.application.utils.StateMachineDriver.nextState(StateMachineDriver.java:52) at weblogic.application.internal.flow.ModuleStateDriver.start(ModuleStateDriver.java:119) at weblogic.application.internal.flow.ScopedModuleDriver.start(ScopedModuleDriver.java:200) at weblogic.application.internal.flow.ModuleListenerInvoker.start(ModuleListenerInvoker.java:247) at weblogic.application.internal.flow.ModuleStateDriver$3.next(ModuleStateDriver.java:425) at weblogic.application.utils.StateMachineDriver.nextState(StateMachineDriver.java:52) at weblogic.application.internal.flow.ModuleStateDriver.start(ModuleStateDriver.java:119) at weblogic.application.internal.flow.StartModulesFlow.activate(StartModulesFlow.java:27) at weblogic.application.internal.BaseDeployment$2.next(BaseDeployment.java:671) at weblogic.application.utils.StateMachineDriver.nextState(StateMachineDriver.java:52) at weblogic.application.internal.BaseDeployment.activate(BaseDeployment.java:212) at weblogic.application.internal.EarDeployment.activate(EarDeployment.java:59) at weblogic.application.internal.DeploymentStateChecker.activate(DeploymentStateChecker.java:161) at weblogic.deploy.internal.targetserver.AppContainerInvoker.activate(AppContainerInvoker.java:79) at weblogic.deploy.internal.targetserver.operations.AbstractOperation.activate(AbstractOperation.java:569) at weblogic.deploy.internal.targetserver.operations.ActivateOperation.activateDeployment(ActivateOperation.java:150) at weblogic.deploy.internal.targetserver.operations.ActivateOperation.doCommit(ActivateOperation.java:116) at weblogic.deploy.internal.targetserver.operations.AbstractOperation.commit(AbstractOperation.java:323) at weblogic.deploy.internal.targetserver.DeploymentManager.handleDeploymentCommit(DeploymentManager.java:844) at weblogic.deploy.internal.targetserver.DeploymentManager.activateDeploymentList(DeploymentManager.java:1253) at weblogic.deploy.internal.targetserver.DeploymentManager.handleCommit(DeploymentManager.java:440) at weblogic.deploy.internal.targetserver.DeploymentServiceDispatcher.commit(DeploymentServiceDispatcher.java:163) at weblogic.deploy.service.internal.targetserver.DeploymentReceiverCallbackDeliverer.doCommitCallback(DeploymentReceiverCallbackDeliverer.java:195) at weblogic.deploy.service.internal.targetserver.DeploymentReceiverCallbackDeliverer.access$100(DeploymentReceiverCallbackDeliverer.java:13) at weblogic.deploy.service.internal.targetserver.DeploymentReceiverCallbackDeliverer$2.run(DeploymentReceiverCallbackDeliverer.java:68) at weblogic.work.SelfTuningWorkManagerImpl$WorkAdapterImpl.run(SelfTuningWorkManagerImpl.java:545) at weblogic.work.ExecuteThread.execute(ExecuteThread.java:256) at weblogic.work.ExecuteThread.run(ExecuteThread.java:221) Caused by: org.springframework.beans.BeanInstantiationException: Could not instantiate bean class [org.springframework.http.converter.json.MappingJacksonHttpMessageConverter]: Constructor threw exception; nested exception is java.lang.NoClassDefFoundError: org/codehaus/jackson/map/ObjectMapper at org.springframework.beans.BeanUtils.instantiateClass(BeanUtils.java:164) at org.springframework.beans.factory.support.SimpleInstantiationStrategy.instantiate(SimpleInstantiationStrategy.java:89) at org.springframework.beans.factory.support.AbstractAutowireCapableBeanFactory.instantiateBean(AbstractAutowireCapableBeanFactory.java:1069) ... 59 more Caused by: java.lang.NoClassDefFoundError: org/codehaus/jackson/map/ObjectMapper at org.springframework.http.converter.json.MappingJacksonHttpMessageConverter.<init>(MappingJacksonHttpMessageConverter.java:63) at sun.reflect.NativeConstructorAccessorImpl.newInstance0(Native Method) at sun.reflect.NativeConstructorAccessorImpl.newInstance(NativeConstructorAccessorImpl.java:39) at sun.reflect.DelegatingConstructorAccessorImpl.newInstance(DelegatingConstructorAccessorImpl.java:27) at java.lang.reflect.Constructor.newInstance(Constructor.java:513) at org.springframework.beans.BeanUtils.instantiateClass(BeanUtils.java:148) ... 61 more Caused by: java.lang.ClassNotFoundException: org.codehaus.jackson.map.ObjectMapper at weblogic.utils.classloaders.GenericClassLoader.findLocalClass(GenericClassLoader.java:297) at weblogic.utils.classloaders.GenericClassLoader.findClass(GenericClassLoader.java:270) at java.lang.ClassLoader.loadClass(ClassLoader.java:306) at java.lang.ClassLoader.loadClass(ClassLoader.java:247) at weblogic.utils.classloaders.GenericClassLoader.loadClass(GenericClassLoader.java:179) ... 67 more

Message icon - Error Substituted for missing class org.springframework.beans.BeanInstantiationException - Could not instantiate bean class [org.springframework.http.converter.json.MappingJacksonHttpMessageConverter]: Constructor threw exception; nested exception is java.lang.NoClassDefFoundError: org/codehaus/jackson/map/ObjectMapper 

jquery calendar div not showing as dialog

I am using a jquery calendar div. When clicking on calendar icon it doesn't show as a pop up, instead it shows up as a regular div and displaces the other page elements.

Here are the screenshots of the problem. I have reproduced the same problem in jsfiddle:
http://jsfiddle.net/sanjayingole/uuopy4y3/

This is before Clicking the Calendar icon:


This is after clicking the Calendar Icon. Other fields are displaced once you click on the Calendar link.


The expected behavior is to show the Calendar as a dialog so all the other fields remain in same position.


Wednesday, July 15, 2015

Jquery Example : Open Calendar Datepicker on anchor click event

Following example shows a generic method that will enable adding multiple date picker fields on a page. This example assumes that are multiple date fields on the page hence we pass the id attribute dynamically.

This specific example required three separate input fields for date, month and year respectively.
Example uses JQuery UI 1.9.2 and some external resources :

http://netdna.bootstrapcdn.com/font-awesome/3.2.1/css/font-awesome.min.css
https://maxcdn.bootstrapcdn.com/bootstrap/3.3.5/js/bootstrap.min.js
http://fortawesome.github.io/Font-Awesome/assets/font-awesome/css/font-awesome.css

Following structure is required for add a date div:

  <div id="dateDiv" class="dateDiv">
        <input type="text" id="monthField"></input> /
        <input type="text" id="dayField"></input> /
        <input type="text" id="yearField"></input>
        <a id="date1Link" onClick="openCalendar('dateDiv')" class="datepickerlink"><i class='fa fa-calendar' title="select"></i></a>
        <br/><span class="dateFormatStr">(mm/dd/yyyy)</span>
    </div>

This above structure can easily changed to just have one text field if required.

Following javascript method openCalendar() will be invoked  on onclick event of the link:
This method triggers the calendar control and set the values in three text fields for day, month and year respective.

<script>
    function openCalendar(dateDivElement){
        $('#' + dateDivElement).datepicker({
                showOn: "button",
                buttonText: "<i class='fa fa-calendar'></i>",
                showAnim:"",
                defaultDate: '',
                dateFormat: "mm/dd/yy",
                onSelect: function(date, eventField) {
                    //eventField returns the field on which datepicker is applied.
                    var day = $(this).datepicker('getDate').getDate();
                    var month = $(this).datepicker('getDate').getMonth() + 1;
                    var year = $(this).datepicker('getDate').getYear();
                    $('#selectedDate').html(date);
                    $('#' + dateDivElement +  ' #dayField').val(day);
                    $('#' + dateDivElement +  ' #monthField').val(month);
                    $('#' + dateDivElement +  ' #yearField').val(year);
                    $('#' + dateDivElement +  ' .ui-datepicker').hide();
                }
        });
    }
</script>

A working example of this can be seen in jsfiddle http://jsfiddle.net/sanjayingole/4s8vdmwm/1/

Please note this example dynamically passes the id of the current div in openCalendar() method due but this this can be more easier if there is only one date field on the page, in that case you can simply hard code the name of the input field id in jquery selector. Please refer to the following example for the same http://sanjayingole.blogspot.com/2015/07/an-example-to-add-calendar-control.html

An Example to add a Calendar Control using Jquery and Font-Awesome

Following is an example to add Calendar Control using Jquery and Font Awesome.

There are two date pickers being used here  :

1. First one uses single field with a formatted date.
2. Second one uses three different boxes for month, date and year respectively.

It depends on the requirements which one to use.


Following is the code for above example. To see this running example follow the jsfiddle link here:
http://jsfiddle.net/sanjayingole/6hmdgmdo/

HTML

<div id="inputDiv">
    <h3>Select a Date</h3>

    <div class="dateDiv">
        <input id="sampleDateField1" type="text" class="datepicker" />
        <br/><span class="dateFormatStr">(mm/dd/yyyy)</span>
    </div>

    <div class="dateDiv">
        <input type="text" id="monthField"></input> /
        <input type="text" id="dayField"></input> /
        <input type="text" id="yearField"></input>
        <span id="sampleDateField2"><i class='fa fa-calendar' title="select"></i></span>
        <br/><span class="dateFormatStr">(mm/dd/yyyy)</span>
    </div>
 
    <h3>Selected Date : <span id="selectedDate"></span>  </h3>
 

</div>


CSS

.datepicker{
    width : 80px;    
}

#inputDiv {
    padding-left : 5px;
    float : left;   
    width : 100%;
    height : 300px;
    background-color : #DFEFDD;
}

#dayField{
    width : 20px;
}
#monthField{
    width : 20px;
}
#yearField{
    width : 40px;
}

#caltype1 {
   width : 100px; 
}

.dateDiv { 
    margin : 20px;   
}
.dateFormatStr {
        margin-left : 20px;
}

JAVASCRIPT

$( "#sampleDateField1" ).datepicker({
                showOn: "button",
                buttonText: "<i class='fa fa-calendar'></i>",
                showAnim:"",
                defaultDate: '',
                dateFormat: "mm/dd/yy",
                onSelect: function(date) {
                    $('#selectedDate').html(date);
                }
});

$("#sampleDateField2").unbind().bind("click",function(){
    $('#sampleDateField2 .ui-datepicker').show();
    $( "#sampleDateField2" ).datepicker({
                showOn: "button",
                buttonText: "<i class='fa fa-calendar'></i>",
                showAnim:"",
                defaultDate: '',
                dateFormat: "mm/dd/yy",
                onSelect: function(date, eventField) {
                    //eventField returns the field on which datepicker is applied.
                    var day = $(this).datepicker('getDate').getDate();  
                    var month = $(this).datepicker('getDate').getMonth() + 1;  
                    var year = $(this).datepicker('getDate').getYear();  
                    $('#selectedDate').html(date);
                    $('#dayField').val(day);
                    $('#monthField').val(month);
                    $('#yearField').val(year);
                    $('#sampleDateField2 .ui-datepicker').hide();
                }
    });    
});      

Tuesday, July 14, 2015

Exception while deploying application using beanstalk in Eclipse

I am using Eclipse Juno to deploy a sample web application on AWS using beanstalk, but getting exception while deploying application :

Exception while deploying application using beanstalk in Eclipse:

Unable to upload application to Amazon S3: User: arn:aws:iam::256104670613:user/dev-user is not authorized to perform: elasticbeanstalk:CreateStorageLocation User: arn:aws:iam::256104670613:user/dev-user is not authorized to perform: elasticbeanstalk:CreateStorageLocation
Solution :

Created two user groups :

1. dev-group - with following policies attached:

  • IAMFullAccess
  • AmazonS3FullAccess
2. dev-ops - with following policy attached:
  • AWSElasticBeanstalkFullAccess
And added the user dev-user to both of these groups. That resolved the issue.

Also are available the read only versions of these policies if required:
  •  IAMReadOnlyAccess
  • AmazonS3ReadOnlyAccess
  • AWSElasticBeanstalkReadOnlyAccess


Using Jquery for a fixed footer


Following example shows the use of jquery to keep the footer at the bottom:


<script type="text/javascript">
$(document).ready(function(){

resizeContainer();

$(window).load(function() {
try {
resizeContainer();
}catch(err) {
return false;
}
});

});

function resizeContainer() {

x = $('.pageContainer').height() + 30; // 30 gives space between div and footer
y = $(window).height();

if (x + 30 <= y){
   $('.footer').css('position', 'fixed');
 
}else{
   $('.footer').css('position', 'relative');  
}
}
</script>